
Let’s be real: most developers decide what to blog about on a whim.
Our blogs cover tons of topics, and there’s a good chance that the only person interested in ALL of them is, well, us.
That’s just one reason it’s handy to tag and segment subscribers to your email list.
Basically this means assigning tags to people based on what blog post made them decide to subscribe.
You can use tags and segments to:
- Get feedback about content that resonates with people
- Create more customized evergreen newsletters
- Generally, send emails that people will likely find interesting!
It’s not too tricky to do, and worst case scenario you can always ignore the tags if you don’t need them in the future. The post is a bit long but it has pictures and working code samples! 🎈
In this post you will learn:
- How to choose subscriber tags for your blog posts
- How to use your segmented email list effectively
- Tutorial: How to tag ConvertKit subscribers with hidden fields in Hugo or Gatsby
- Troubleshooting
- Advanced tagging techniques
NOTE: The code samples in this post will be using Hugo or Gatsby with ConvertKit . However, you can apply the same principles with other tools. Some email platforms won’t make it easy to do without using an API (looking at you Mailchimp), but this post is for us lazy devs who don’t want to deal with that on our static blogs!
How to choose subscriber tags for your blog posts
There is no right or wrong way to tag subscribers. Just think about the different groups you might want to tailor your emails for. When you’re ready to send an email, you’ll group together those tags to create a segment and you can combine as many as you want.
In terms of software development, I like to use:
- Programming language – e.g. “haskell”, “golang”, “javascript”
- Library, framework, or tool – e.g. “git”, “react”, “gatsby”, “vim”
- Persona – e.g. “developer”, “job seeker”, “manager”
- Topic – e.g. “hiring”, “management”, “career”, “software”, “blogging”
As a concrete example, on this blog I have a post on configuring your vim for writing Haskell and a post about creating a Gatsby theme.
These are the two sets of tags I’ve chosen:
- “haskell”, “vim”, “software”, “developer”
- “react”, “gatsby”, “javascript”, “software”, “developer”
Then, I can create a segment called “Web Dev” which includes all subscribers tagged with “react”, “gatsby”, or “javascript” (and my other tags like “webpack” or “css” or whatever I want).
How to use your segmented email list effectively
Create multiple evergreen newsletter sequences
You can use these to create an evergreen newsletter that’s tailored to people’s different interests.
What this basically means is that when someone subscribes to your blog, they don’t just get an email whenever you publish new content.
Instead, you put them on an automatic sequence of emails, spaced out over time, that sends them previously published content. And thanks to tagging, they’ll get content tailored to their interests.
Anytime you publish new content, you just add another email to the end of the sequence.
It’s like an automated newsletter!
And a big help towards being consistent without, well, actually having to be consistent.
If you want to learn more on this topic, you can check out Joel Hooks’ post comparing an evergreen newsletter sequence to a bonsai tree :)
Share one-off news to a relevant audience
For example, if I publish something like my Gatsby theme for knowledge bases, I can be sure to only email people who are tagged with “javascript” or “react” instead of everyone.
You can still include those “specialized” blog posts in a typical newsletter, but instead of sending out a dedicated email about it, it can be in a list of “In case you missed it” content.
Launch your own product
Lastly, one of the big reasons developers even start building an email list is because they launch a product. This can give you an idea of how many people who are subscribed to your email list could even find the product relevant for them.
With that in mind, here’s how to quickly set up these tags using Hugo or Gatsby with ConvertKit.
Again, you can take the same technique and modify it for most platforms.
(Besides, isn’t Spring a great time to get on top of your newsletter? 💐)
Tutorial: How to tag ConvertKit subscribers with hidden fields in Hugo or Gatsby
End result: You’ll be able to embed a ConvertKit subscription form on your Hugo or Gatsby blog inside any blog post or template with code that looks like this:
For Hugo:
{{< subscribe tags="software,react" >}}
For Gatsby:
<SubscriptionForm tags={['software', 'react']}/>
It will automatically tag new subscribers on that post with those tags, which you can later use to create segments in ConvertKit!
You can also set this up to draw the tags from the frontmatter in your posts if you prefer, but this tutorial will cover pulling them from the parameters / props instead.
In this tutorial, I’m going to start with a fresh ConvertKit account.
For the technical implementation, I’ll explain how to do each step for Hugo first, and then Gatsby second.
Hugo is a bit easier because you can take advantage of ConvertKit’s forms without too much fuss. However, there are complete code samples you can use for both.
Here are the steps we’ll go through:
- Create all the tags you want in ConvertKit
- Create a form and add all the tags to the form
- Copy the HTML into a new shortcode or component
- Extract the tags and IDs into a data file
- Modify the code to accept arguments and check the hidden checkboxes
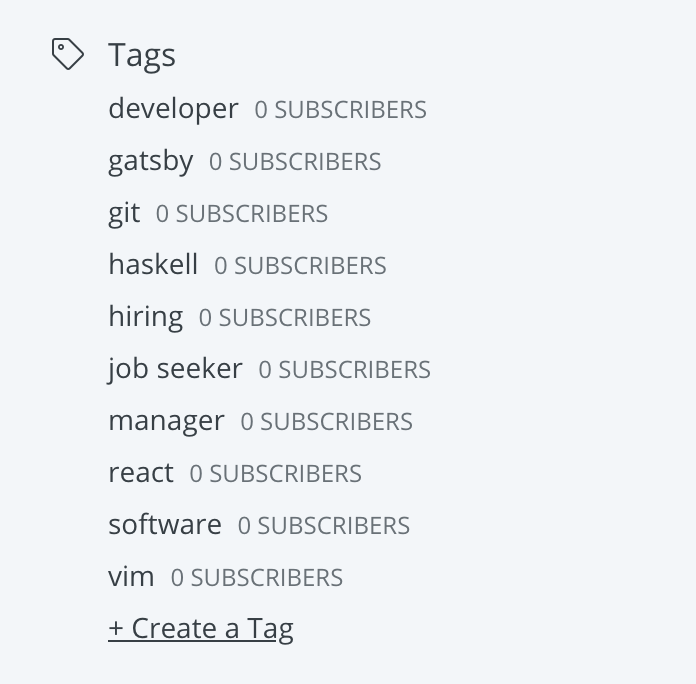
Step 1. Create all the tags you want in ConvertKit
After logging in to ConvertKit, find the Tags section on the right side of the screen.
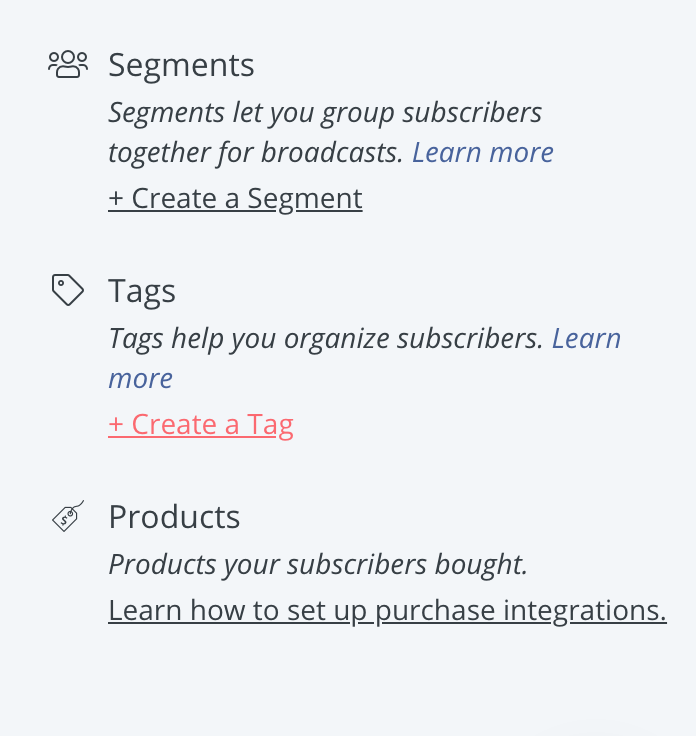
Click “+ Create a Tag”, which opens this dialog:
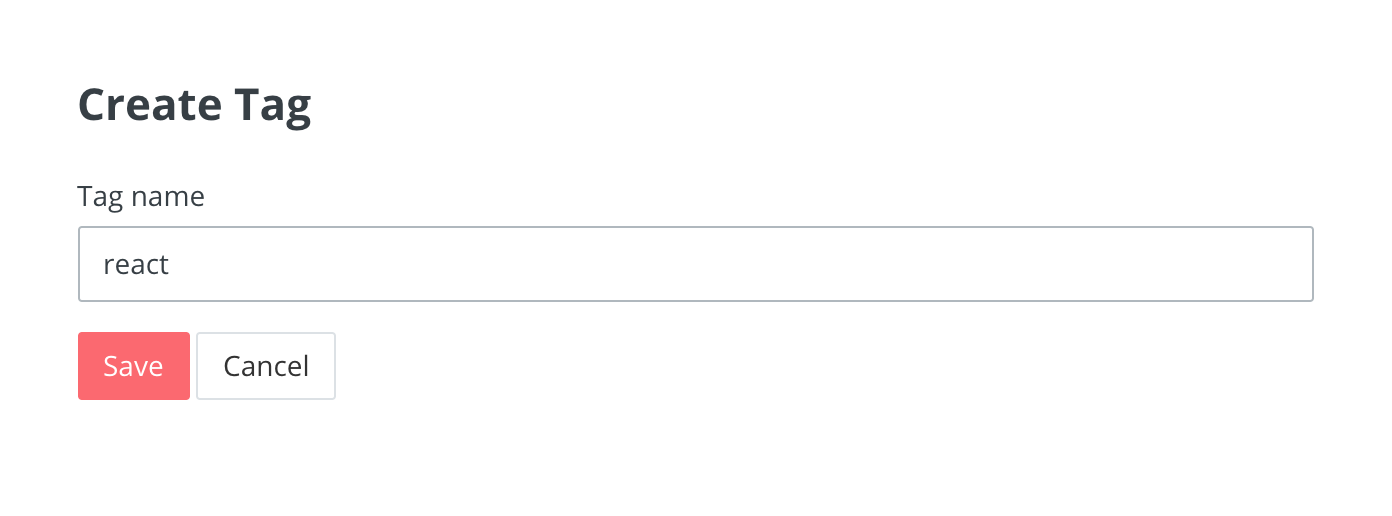
Repeat to create as many tags as you want. You will be able to add more later.
Step 2. Create a form and add all the tags to the form
Click “Landing Pages and Forms” and then “Create New”.
Or, go straight to the Create Landing Page or Form page.
Choose “Form”.
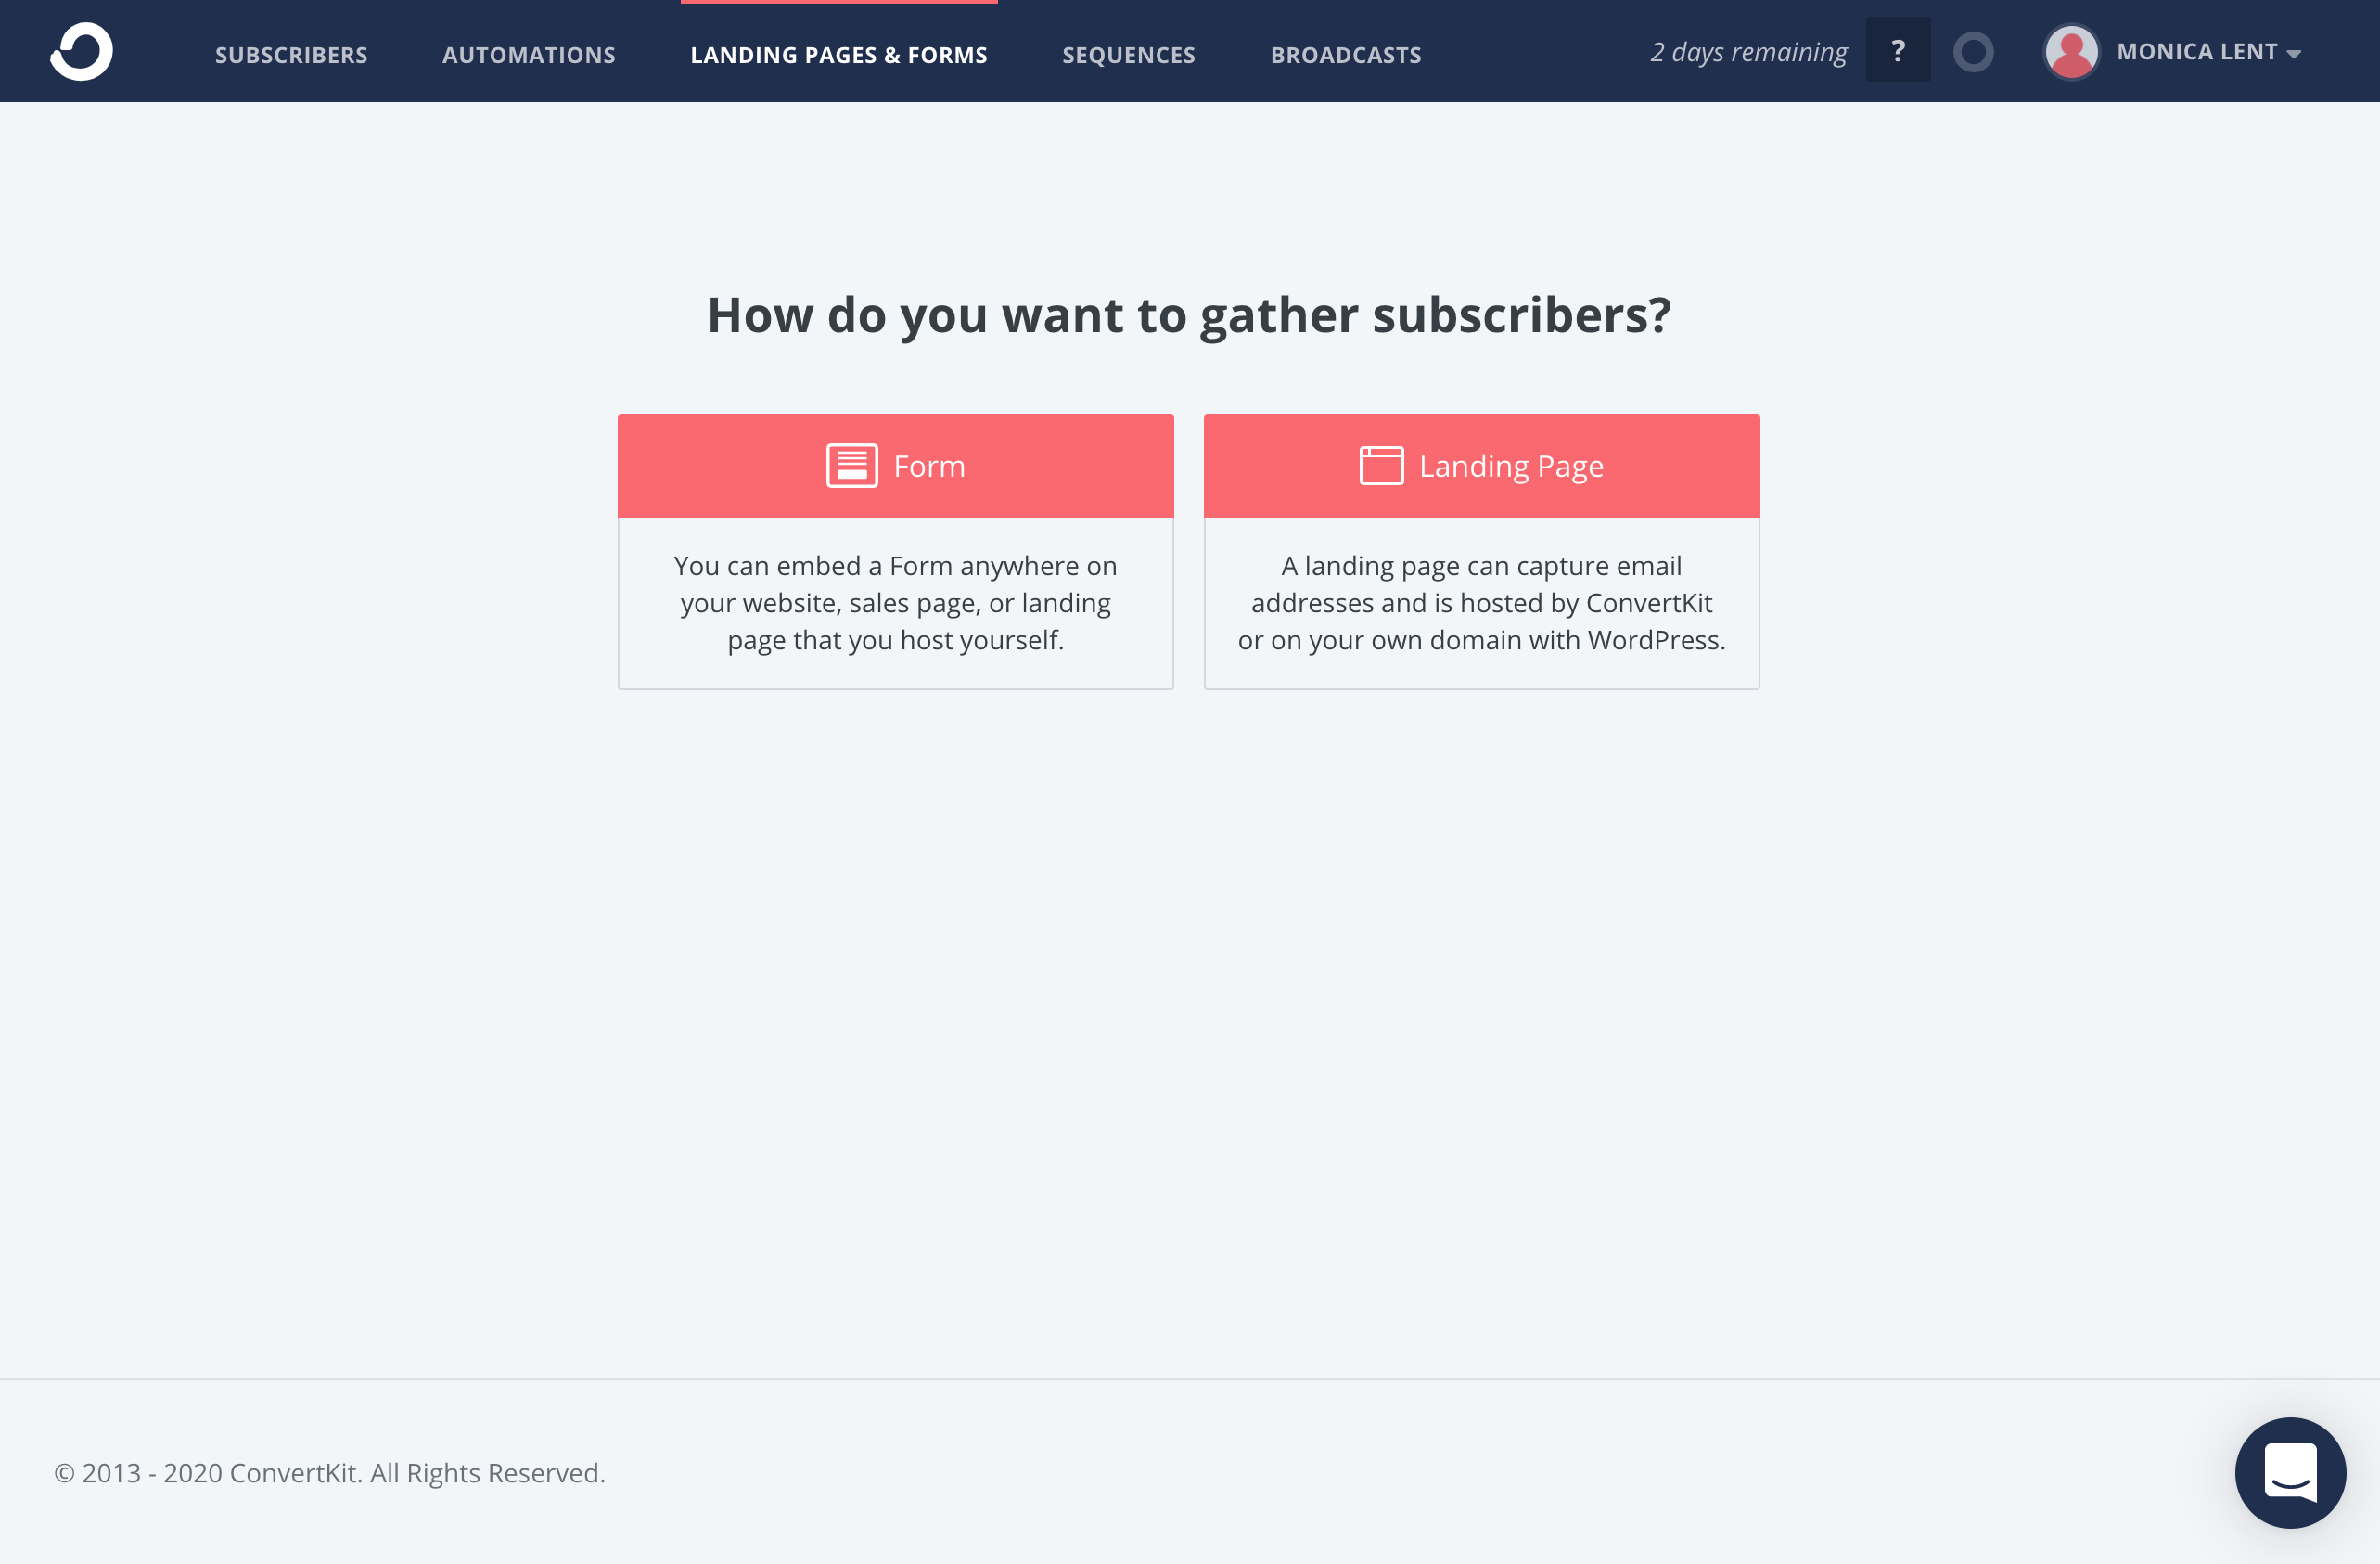
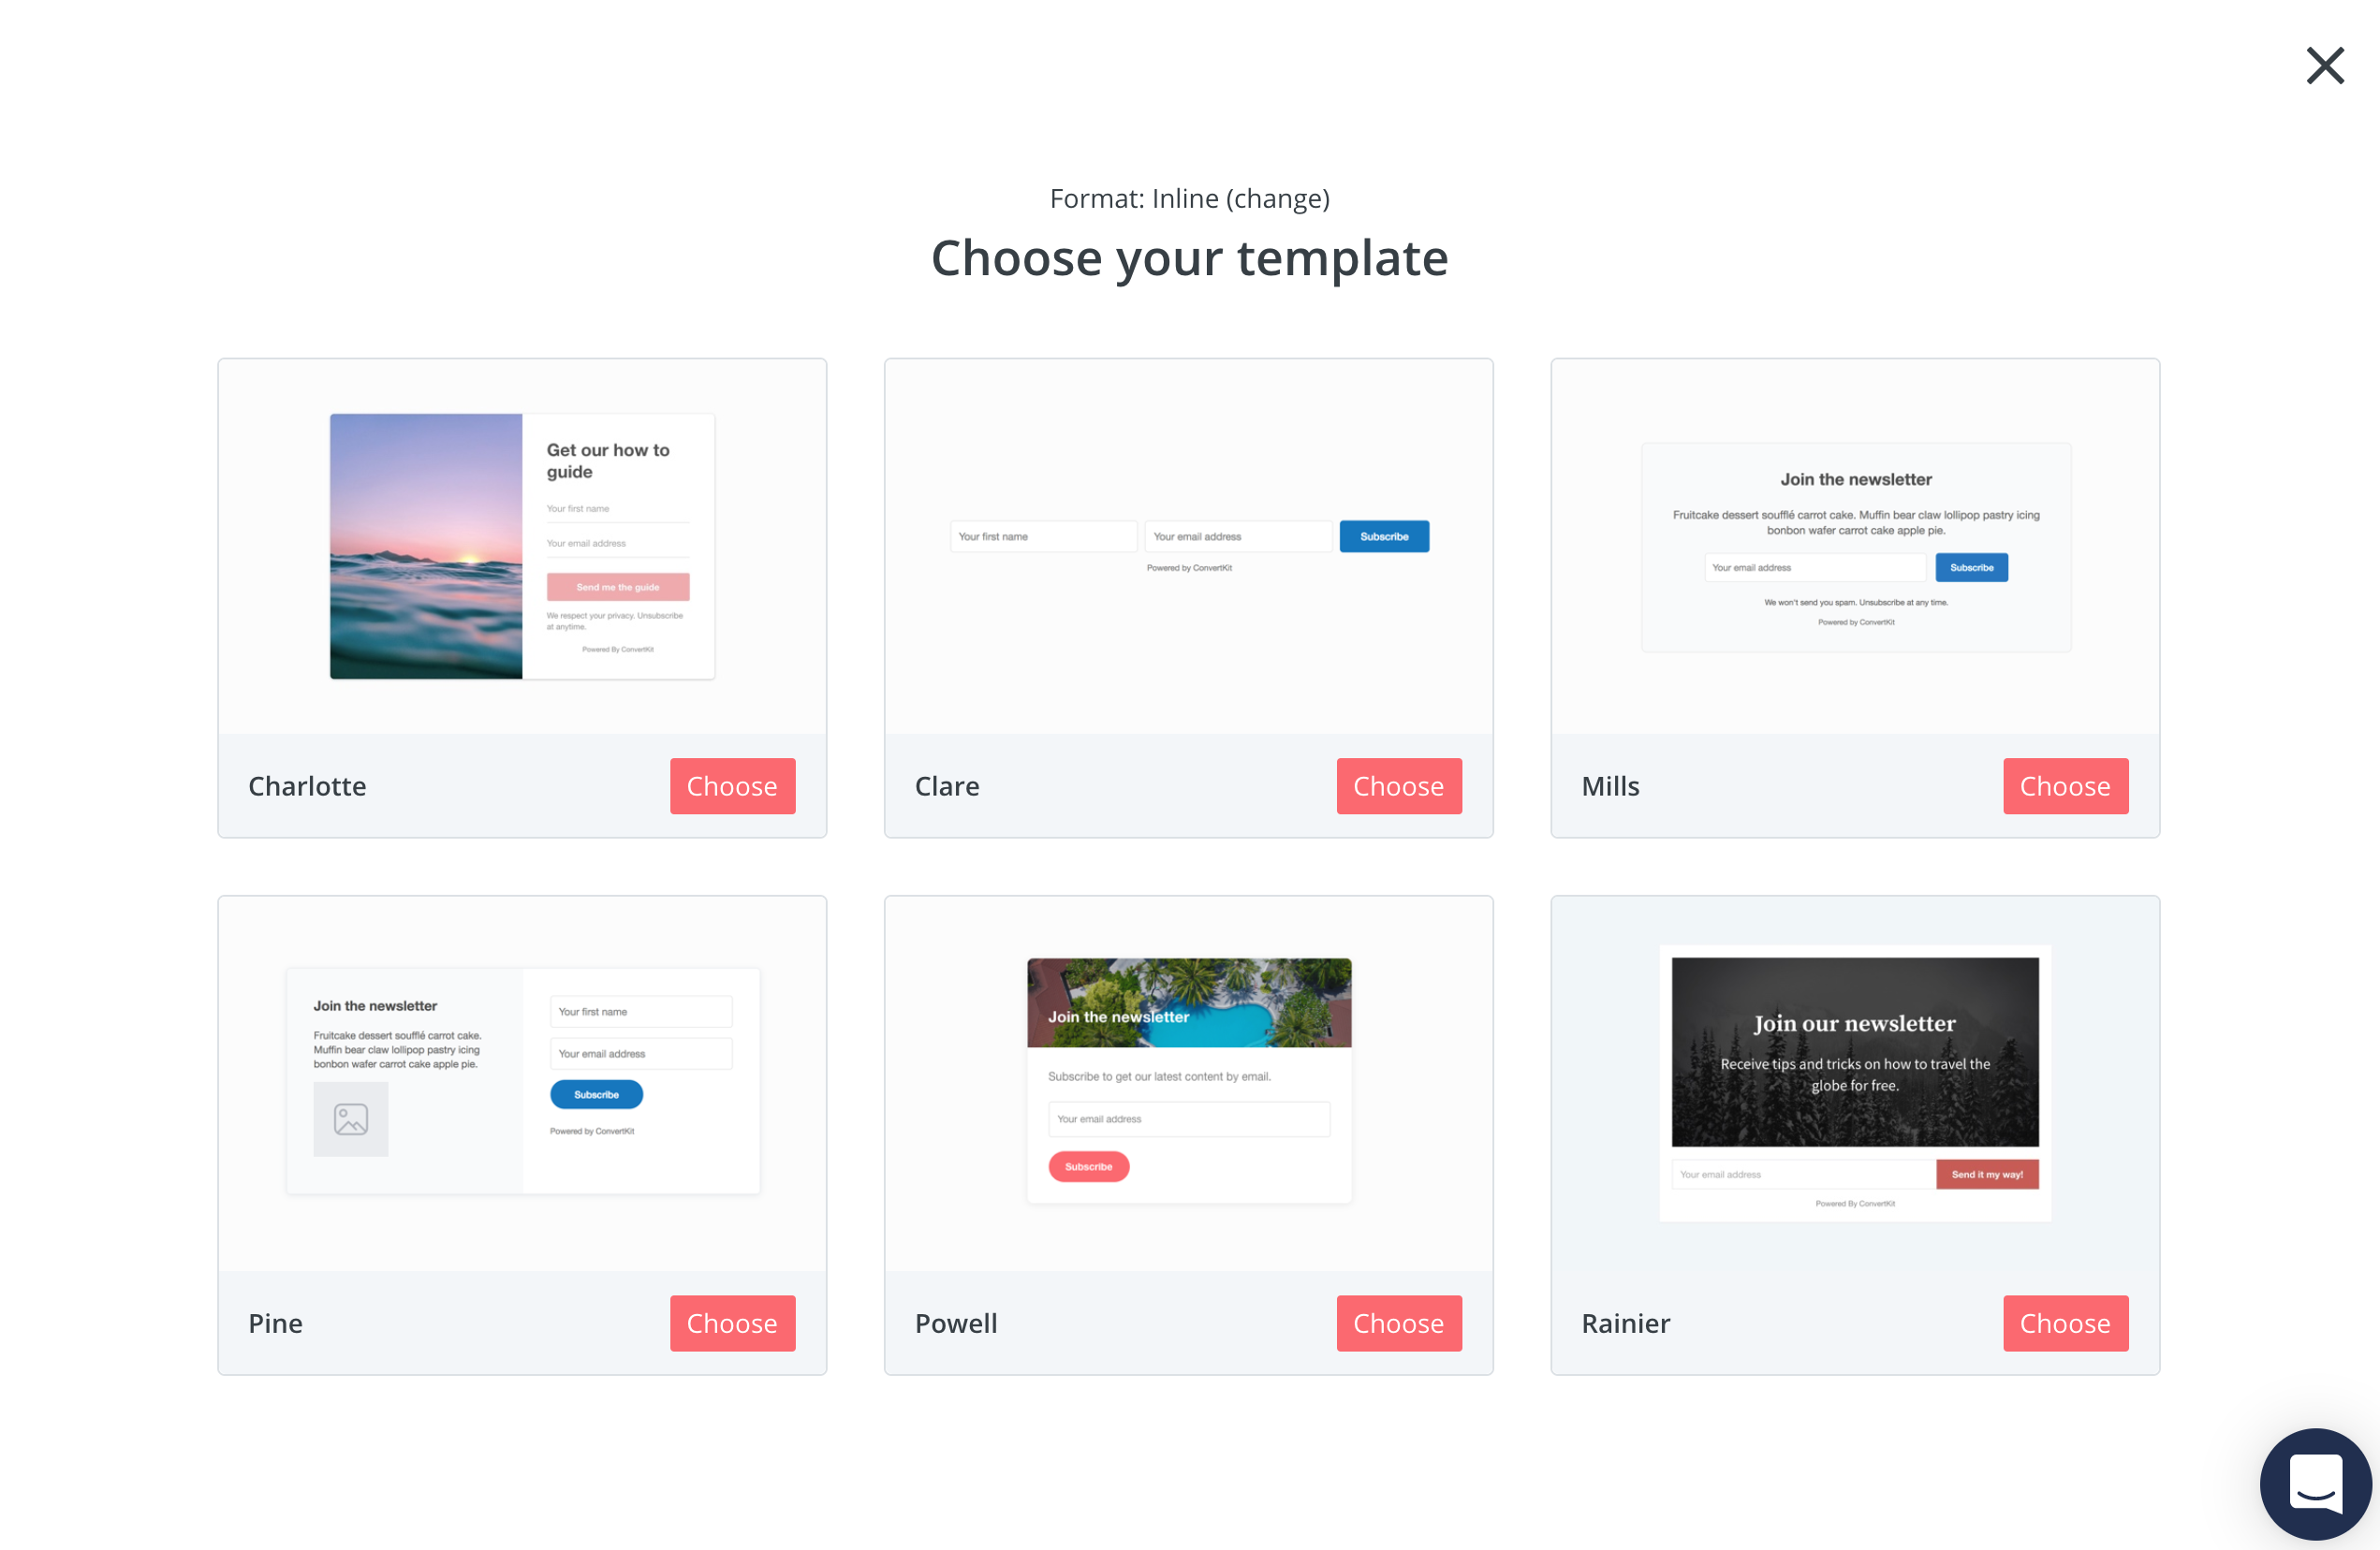
I suggest starting with an “Inline” form.
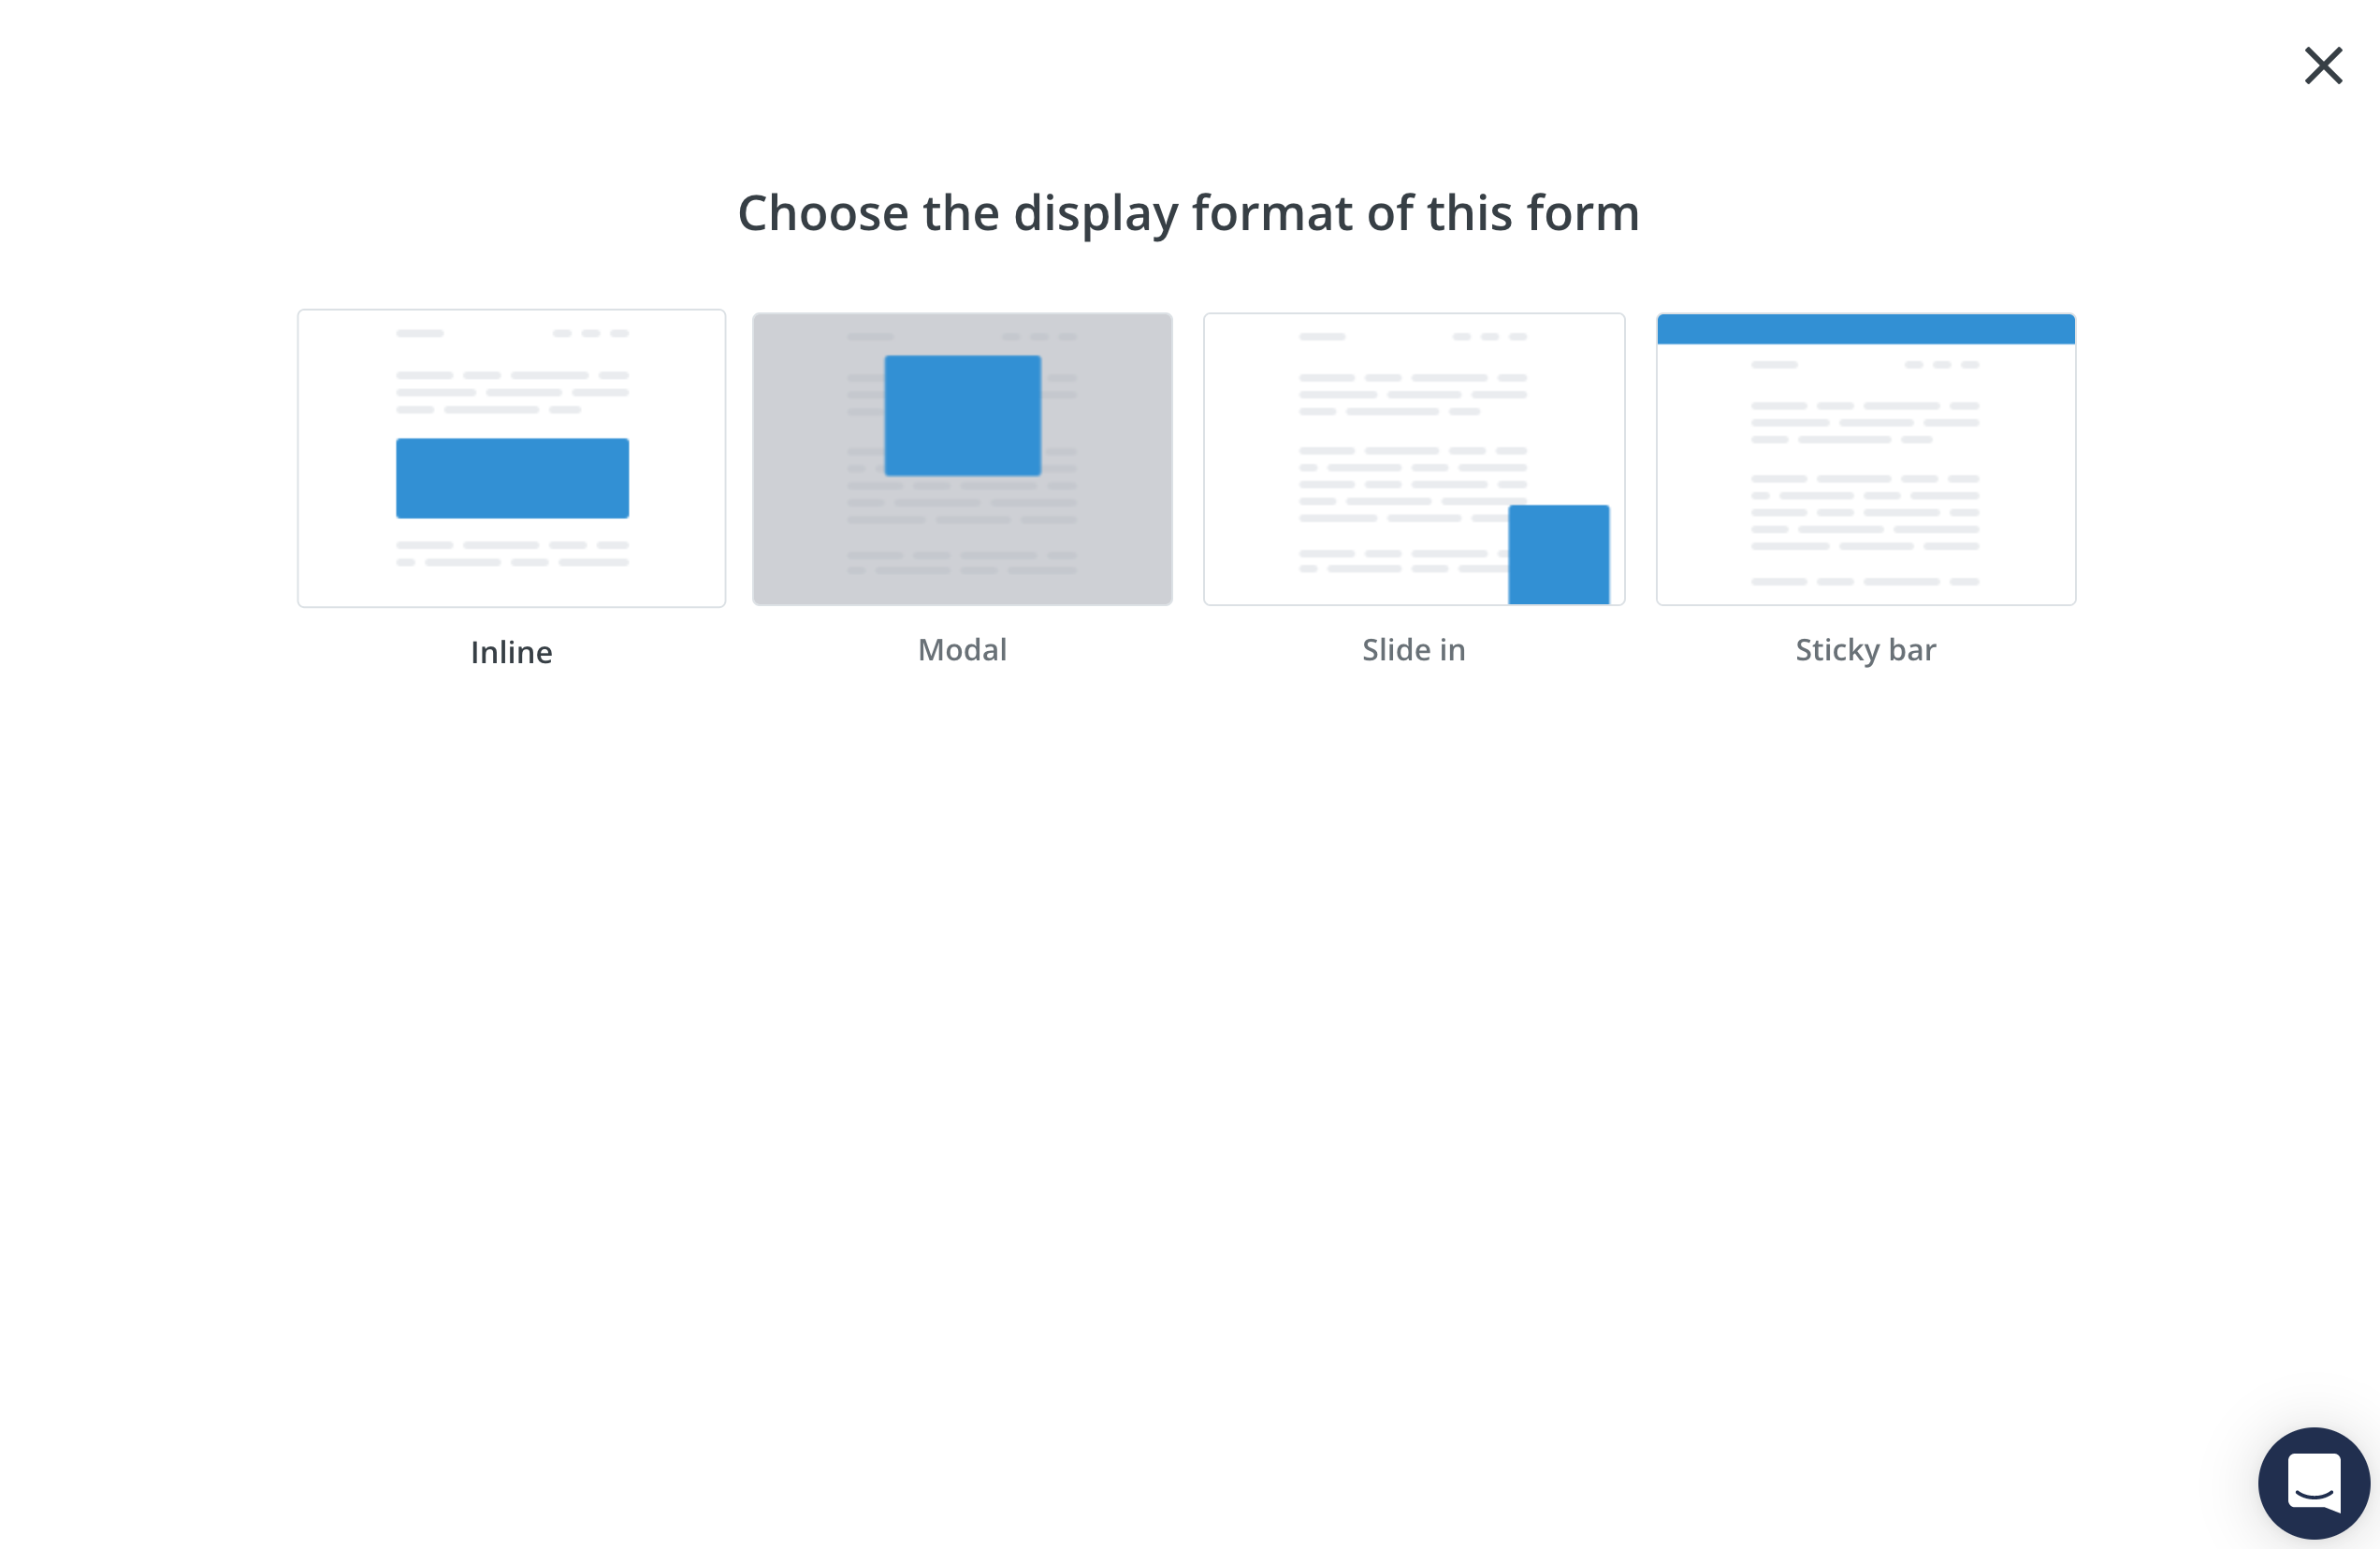
You can pick any design you want, and customize it to match your site.
Gatsby tip: It can be a bit painful to use ConvertKit’s forms and Gatsby/React together compared to a vanilla HTML generator like Hugo. I’ll show you how to make a low-tech form using ConvertKit’s HTML without needing to add their external JavaScript. If you go that route, don’t worry about customizing the form’s design because you’ll customize that yourself in code later.
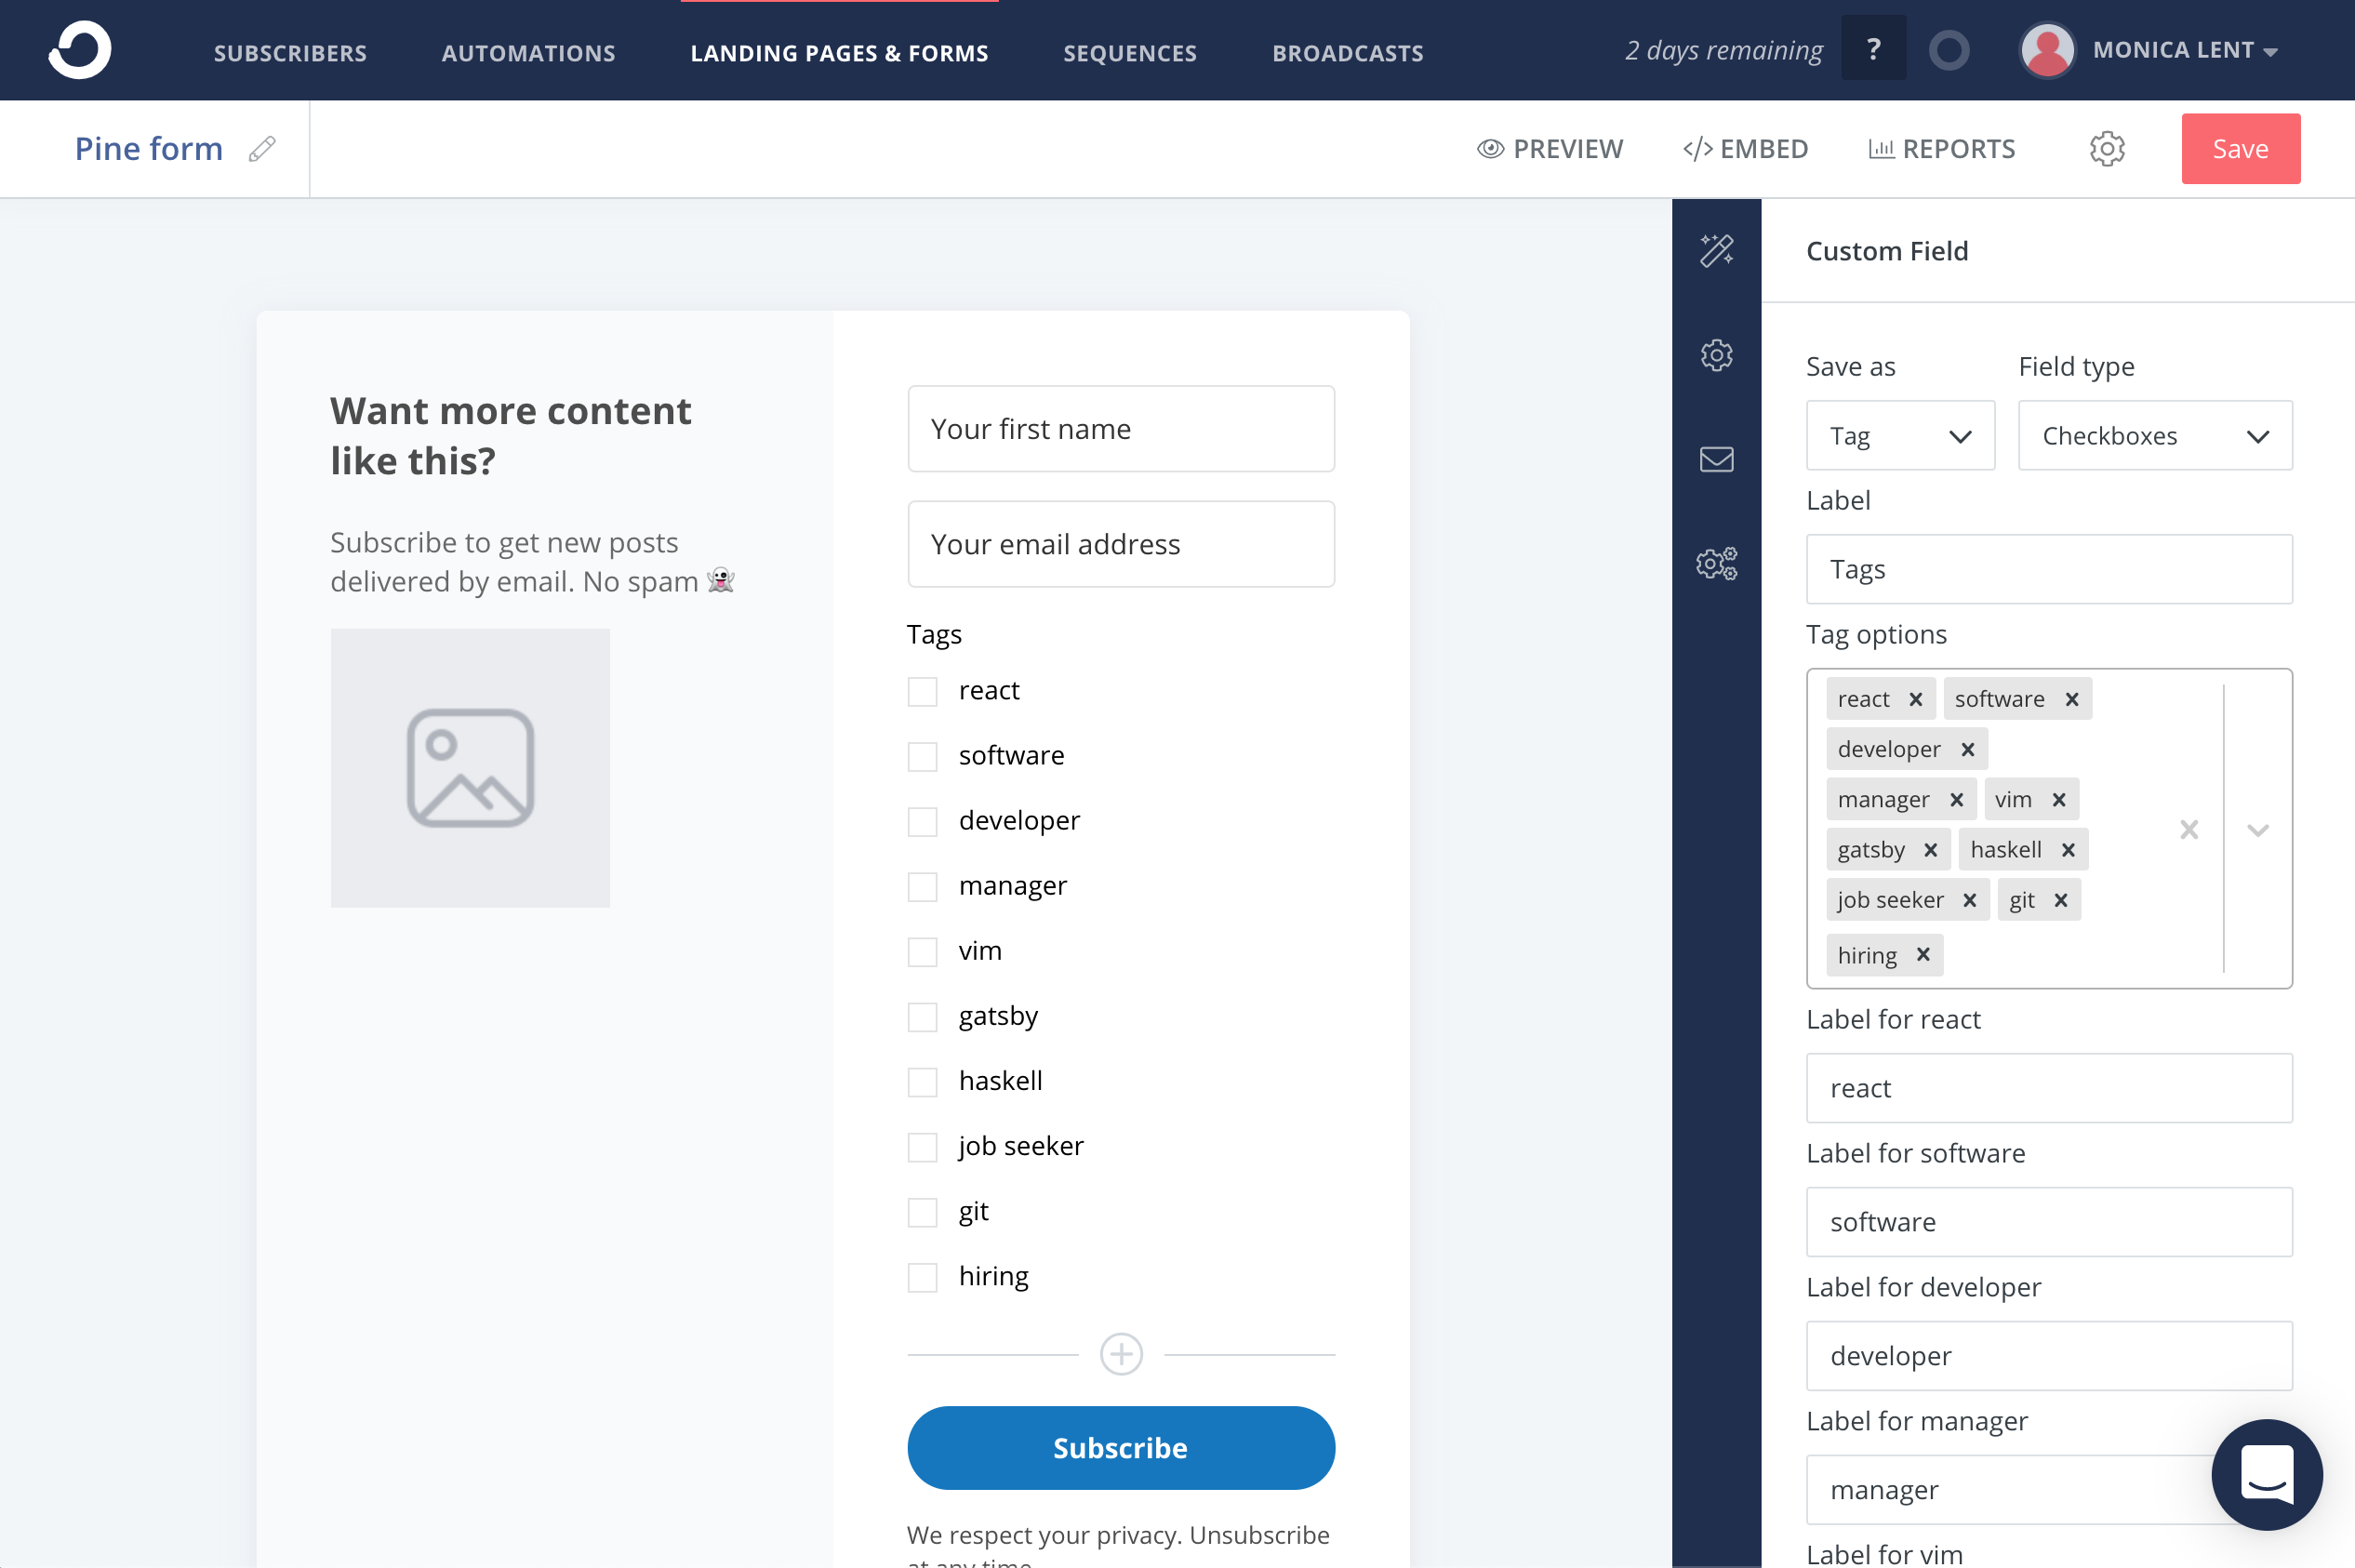
Once you’ve customized the text, click the (+) button to add a Custom Field.

Choose “Save as: Tag” and “Field Type: Checkboxes” and a Label like “Tags”.
Then, add ALL of your tags as tag options. It will make the form ugly, but later we will make those checkboxes hidden and then automatically select them based on the blog post the user is reading.
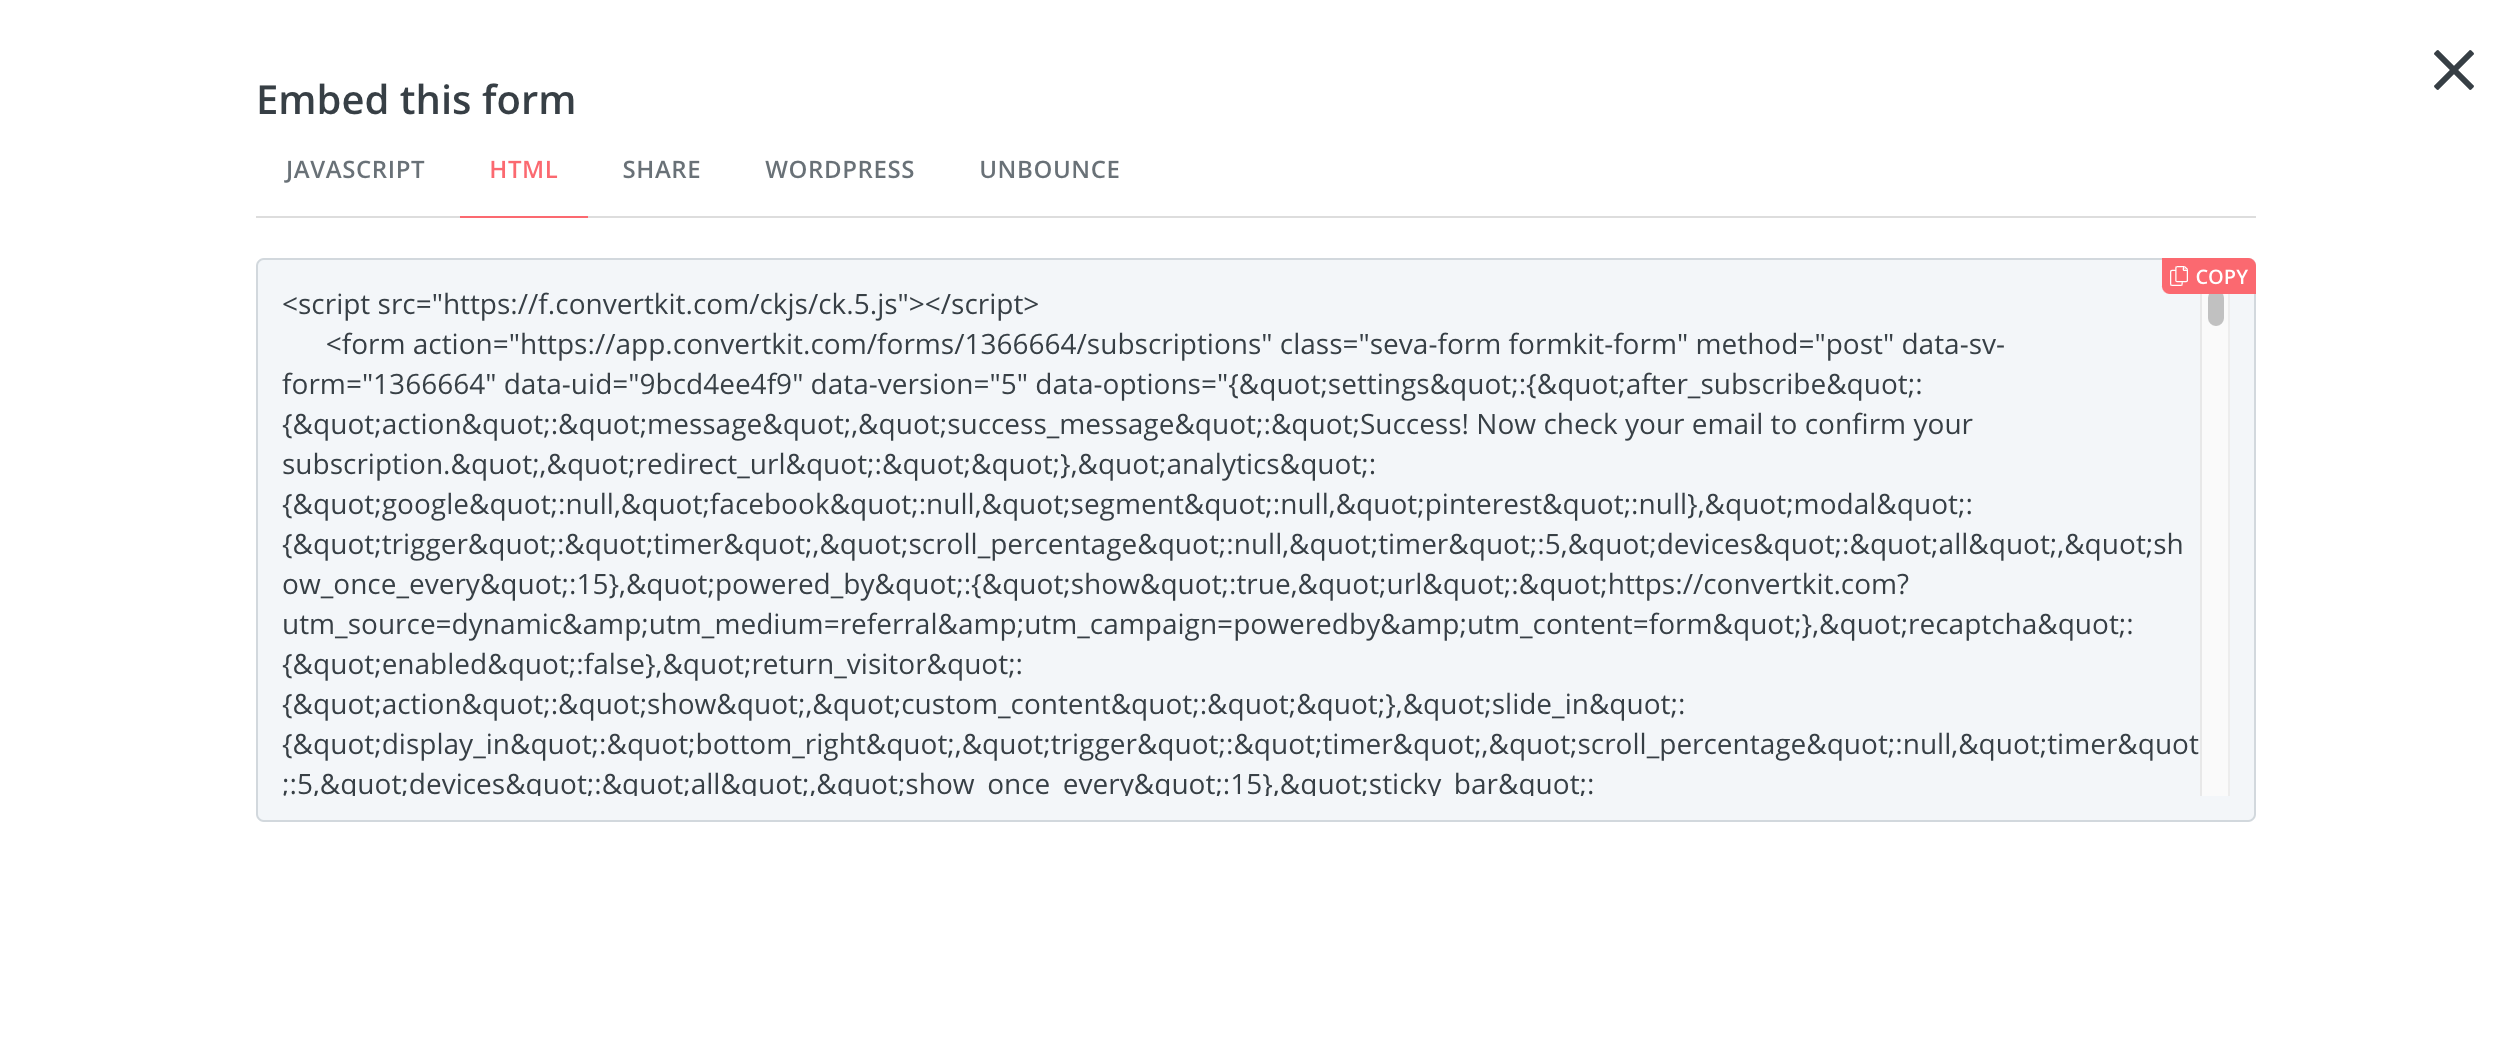
Click “Embed” and then choose to embed via HTML.
Step 3. Copy the HTML into a new shortcode or component
If you’re using Hugo, create a new HTML file at layouts/shortcodes/subscribe.html. You can just dump all that HTML inside, we’ll come back to it later.
If you’re using Gatsby, the easiest way is to create a custom form as a component:
import React, { useState } from 'react';

const SubscriptionForm = () => {

  const [status, setStatus] = useState(null);
  const YOUR_FORM_ID = '';
  const YOUR_FORM_URL = `https://app.convertkit.com/forms/${YOUR_FORM_ID}/subscriptions`;

  const handleSubmit = async (e) => {
    e.preventDefault();
    const data = new FormData(e.target);

    try {
      const response = await fetch(
        YOUR_FORM_URL,
        {
          method: 'post',
          body: data,
          headers: {
            accept: 'application/json',
          },
        }
      );

      const json = await response.json();

      if (json.status === 'success') {
        setStatus('SUCCESS');
        return;
      }

      setStatus('ERROR');
    } catch (err) {
      setStatus('ERROR');
    }
  };

  return (
    <form
      action={YOUR_FORM_URL}
      method="post"
      onSubmit={handleSubmit}
    >
      <input
        type="text"
        aria-label="Your name"
        name="fields[first_name]"
        placeholder="Your name"
        required
      />
      <input
        type="email"
        aria-label="Your email"
        name="email_address"
        placeholder="Your email address"
        required
      />
      <button
        type="submit"
      >
        Subscribe
      </button>
      {status === 'SUCCESS' && <p>Please go confirm your subscription!</p>}
      {status === 'ERROR' && <p>Oops, try again.</p>}
    </form>
  );
};
This form will not be beautiful, but I trust you to make it so 😄
Just make sure you update the form’s action property to whatever it is inside that HTML
you got from ConvertKit. You can search for “action=” in the HTML to find the URL you need.
You should also double check that the input field names match whatever you put in your form.
Next we handle the tags!
Step 4. Extract the tags and IDs into a data file
If you look at the HTML from ConvertKit, you’re going to see a bunch of code that looks like this:
<fieldset data-group="checkboxes" class="formkit-3088" group="field" type="Custom" order="2" save_as="Tag">
    <legend style="color: rgb(0, 0, 0); font-weight: 400;">Tags</legend>
    <div class="formkit-checkboxes" data-element="tags-checkboxes" data-group="checkbox" style="color: rgb(0, 0, 0); border-color: rgb(227, 227, 227); border-radius: 4px; font-weight: 400;">
        <input class="formkit-checkbox" id="tag-3088-1454134" type="checkbox" name="tags[]" value="1454134">
        <label for="tag-3088-1454134">react</label>
    </div>
    <div class="formkit-checkboxes" data-element="tags-checkboxes" data-group="checkbox" style="color: rgb(0, 0, 0); border-color: rgb(227, 227, 227); border-radius: 4px; font-weight: 400;">
        <input class="formkit-checkbox" id="tag-3088-1454139" type="checkbox" name="tags[]" value="1454139">
        <label for="tag-3088-1454139">software</label>
    </div>
</fieldset>
You’ll see this for every tag in your list. Those IDs such as tag-3088-1454139 represent tag-SUBFORM_ID-TAG_ID.
(I don’t really know why there are two numbers, the number in your action submit URL and this number. But they are different, hence I name the second one “subform id”).
So we want to create a data structure that will map some human-friendly names for our tags to their IDs in ConvertKit.
If you’re using Hugo, create a file at data/convertkit_tags.json like this:
{
  "react": "1454134",
  "software": "1454139"
}
But of course, using the names of your tags and their Tag IDs.
If you’re using Gatsby, you’ll probably want to use a combination of the gatsby-transformer-yaml package, and a slightly different structure.
I’d put it at src/data/convertkit-tags/data.yaml structured as an array:
- name: react
  id: "1454134"
- name: software
  id: "1454139"
Again, using your tag names and IDs instead of mine.
Important note: Make sure you quote the IDs instead of just including the numbers, because Gatsby node IDs must be strings.
Then update your gatsby-config.js to include a reference to that:
module.exports = {
  // ...rest of your config here
  plugins: [
      {
        resolve: 'gatsby-source-filesystem',
        options: { path: 'src/data' },
      },
      {
        resolve: 'gatsby-transformer-yaml',
        options: { typeName: 'Tag', path: 'src/data/convertkit-tags' },
      },
      // More plugins you're using
  ]
}
As well as creating types in gatsby-node.js for the Tag so you can get them via GraphQL later:
exports.sourceNodes = ({ actions }) => {
  actions.createTypes(`
    type Tag implements Node @dontInfer {
      id: ID!
      name: String!
    }
  `);
};
A note on Gatsby: Technically you can also put this data inside the component file itself and it will be easier. There’s nothing wrong with doing that per se. However if you e.g. want the component to be reusable on other websites, or you want to re-use the data in different forms, it can be beneficial to separate.
Anytime you create a new tag, you’ll want to add it to this JSON or Yaml list.
You don’t need to modify the form, just open the tag in ConvertKit and grab the ID from the url.
Tip: If you use vim or some other editor that supports macros, you can go in and copy the DOM from the list of Tags in ConvertKit, and then record a macro that converts it to JSON! This is faster and more foolproof than revisiting your form.
Step 5. Modify the shortcode/component to accept arguments and check the hidden checkboxes
Last step, stick with me! 👊
If you’re using Hugo, our shortcode is ultimately going to be used like this:
{{< subscribe tags="software,react" >}}
Note: You can’t create array literals in Golang templates, that’s why we’re using comma separated strings. You choose any delimiter you want if you don’t like commas.
Then, I’d suggest using an HTML formatter to format your code so it’s easy to replace the checkbox section.
Make sure to supply values for $your_form_id and $your_subform_id with the four-digit number you see already in your checkboxes.
layouts/shortcodes/subscribe.html
{{ $unsliced := .Get "tags" }}
{{ $tags := split $unsliced "," }}
{{ $your_form_id := "YOUR_FORM_ID" }} <!-- E.g. 1353144 -->
{{ $your_subform_id := "YOUR_SUBFORM_ID" }} <!-- E.g. 3088 -->

<script src="https://f.convertkit.com/ckjs/ck.5.js"></script>
<form action="https://app.convertkit.com/forms/{{ $your_form_id }}/subscriptions" method="post">

<!-- Your ConvertKit Form HTML here, until the <fieldset> for the tags -->

  {{ if (gt (len $tags) 0) }}
    <fieldset data-group="checkboxes" class="formkit-{{ $your_subform_id }}" group="field" type="Custom" order="2" save_as="Tag" style="display:none">
      {{ range $tag := $tags }}
        {{ if $tag }}
          {{ $tag_id := index $.Site.Data.convertkit_tags $tag }}
          <div data-element="tags-checkboxes" data-group="checkbox">
            <input class="formkit-checkbox" id="tag-{{ $your_subform_id }}-{{ $tag_id }}" type="checkbox" checked="checked" name="tags[]" value="{{ $tag_id }}">
            <label for="tag-{{ $your_subform_id }}-{{ $tag_id }}">{{ $tag }}</label>
          </div>
        {{ end }}
      {{ end }}
    </fieldset>
  {{ end }}

  <!-- Rest of the form, such as the button and all closing tags -->

</form>
What this code does is accept the tags as an argument, splits them from a string into an array, and then looks up the corresponding Tag ID in the JSON using Go’s index function.
Hugo tip: You can also create this same thing as a Hugo partial so it’s included automatically in every blog post. However, you’d need to source the tags from somewhere else, such as a custom field on the frontmatter since you want the data to be different on every post. I always recommend including your subscription form several times on long blog posts, so it doesn’t really matter to me.
Time to test out your form! Embed it in a blog post and submit it.
If you watch the Network tab, you’ll most easily see that the data was submitted properly and received successfully by ConvertKit. You made it! 🎉
If you’re using Gatsby, now we need to query for the tags using StaticQuery and then add hidden checkboxes for each tag.
import React, { useState } from 'react';

// NEW
import { useStaticQuery, graphql } from 'gatsby';

const SubscriptionForm = ({ tags }) => {

  const [status, setStatus] = useState(null);
  const YOUR_FORM_ID = '';
  const YOUR_SUBFORM_ID = '';
  const YOUR_FORM_URL = `https://app.convertkit.com/forms/${YOUR_FORM_ID}/subscriptions`;

  // NEW
  const data = useStaticQuery(graphql`
    query {
      allTag {
        nodes {
          name
          id
        }
      }
    }
  `);

  const allTags = data.allTag.nodes;
  const tagMap = allTags.reduce((result, tag) => {
    result[tag.name] = tag.id;
    return result;
  }, {});

  const handleSubmit = async (e) => {
    e.preventDefault();
    const data = new FormData(e.target);

    try {
      const response = await fetch(
        YOUR_FORM_URL,
        {
          method: 'post',
          body: data,
          headers: {
            accept: 'application/json',
          },
        }
      );

      const json = await response.json();

      if (json.status === 'success') {
        setStatus('SUCCESS');
        return;
      }

      setStatus('ERROR');
    } catch (err) {
      setStatus('ERROR');
    }
  };

  return (
    <form
      action={YOUR_FORM_URL}
      method="post"
      onSubmit={handleSubmit}
    >
      <input
        type="text"
        aria-label="Your name"
        name="fields[first_name]"
        placeholder="Your name"
        required
      />
      <input
        type="email"
        aria-label="Your email"
        name="email_address"
        placeholder="Your email address"
        required
      />

      {/* NEW */}
      {tags.map((tagName) => (
        <input
          key={tagMap[tagName]}
          id={`tag-${YOUR_SUBFORM_ID}-${tagMap[tagName]}`}
          type="checkbox"
          style={{ display: 'none' }}
          checked
          name="tags[]"
          value={tagMap[tagName]}
        />
      ))}

      <button
        type="submit"
      >
        Subscribe
      </button>
      {status === 'SUCCESS' && <p>Please go confirm your subscription!</p>}
      {status === 'ERROR' && <p>Oops, try again.</p>}
    </form>
  );
};
About using display: none – Although
display: nonemakes this checkbox unavailable to screen readers, it’s also not meant to be available to anyone else. If you want to give your readers the chance to choose from a predefined set of tags, you could extend the Yaml with a “label” property and render these for everyone.
Once this component is defined, you can include it in any blog post using Mdx!
And again, if you want to pull the tags from a new frontmatter field, you can do that as well.
Testing your setup
Apart from using the Network tab, you can also test your new form using ConvertKit.
To test your setup, navigate to a page where your new form is present. Make sure you’ve supplied a tag to the shortcode or component.
Subscribe to your own newsletter. You can use something like your.email.address+test@gmail.com
to be considered a new subscriber.
If you have double opt-in set up, make sure to click the button in the confirmation email.
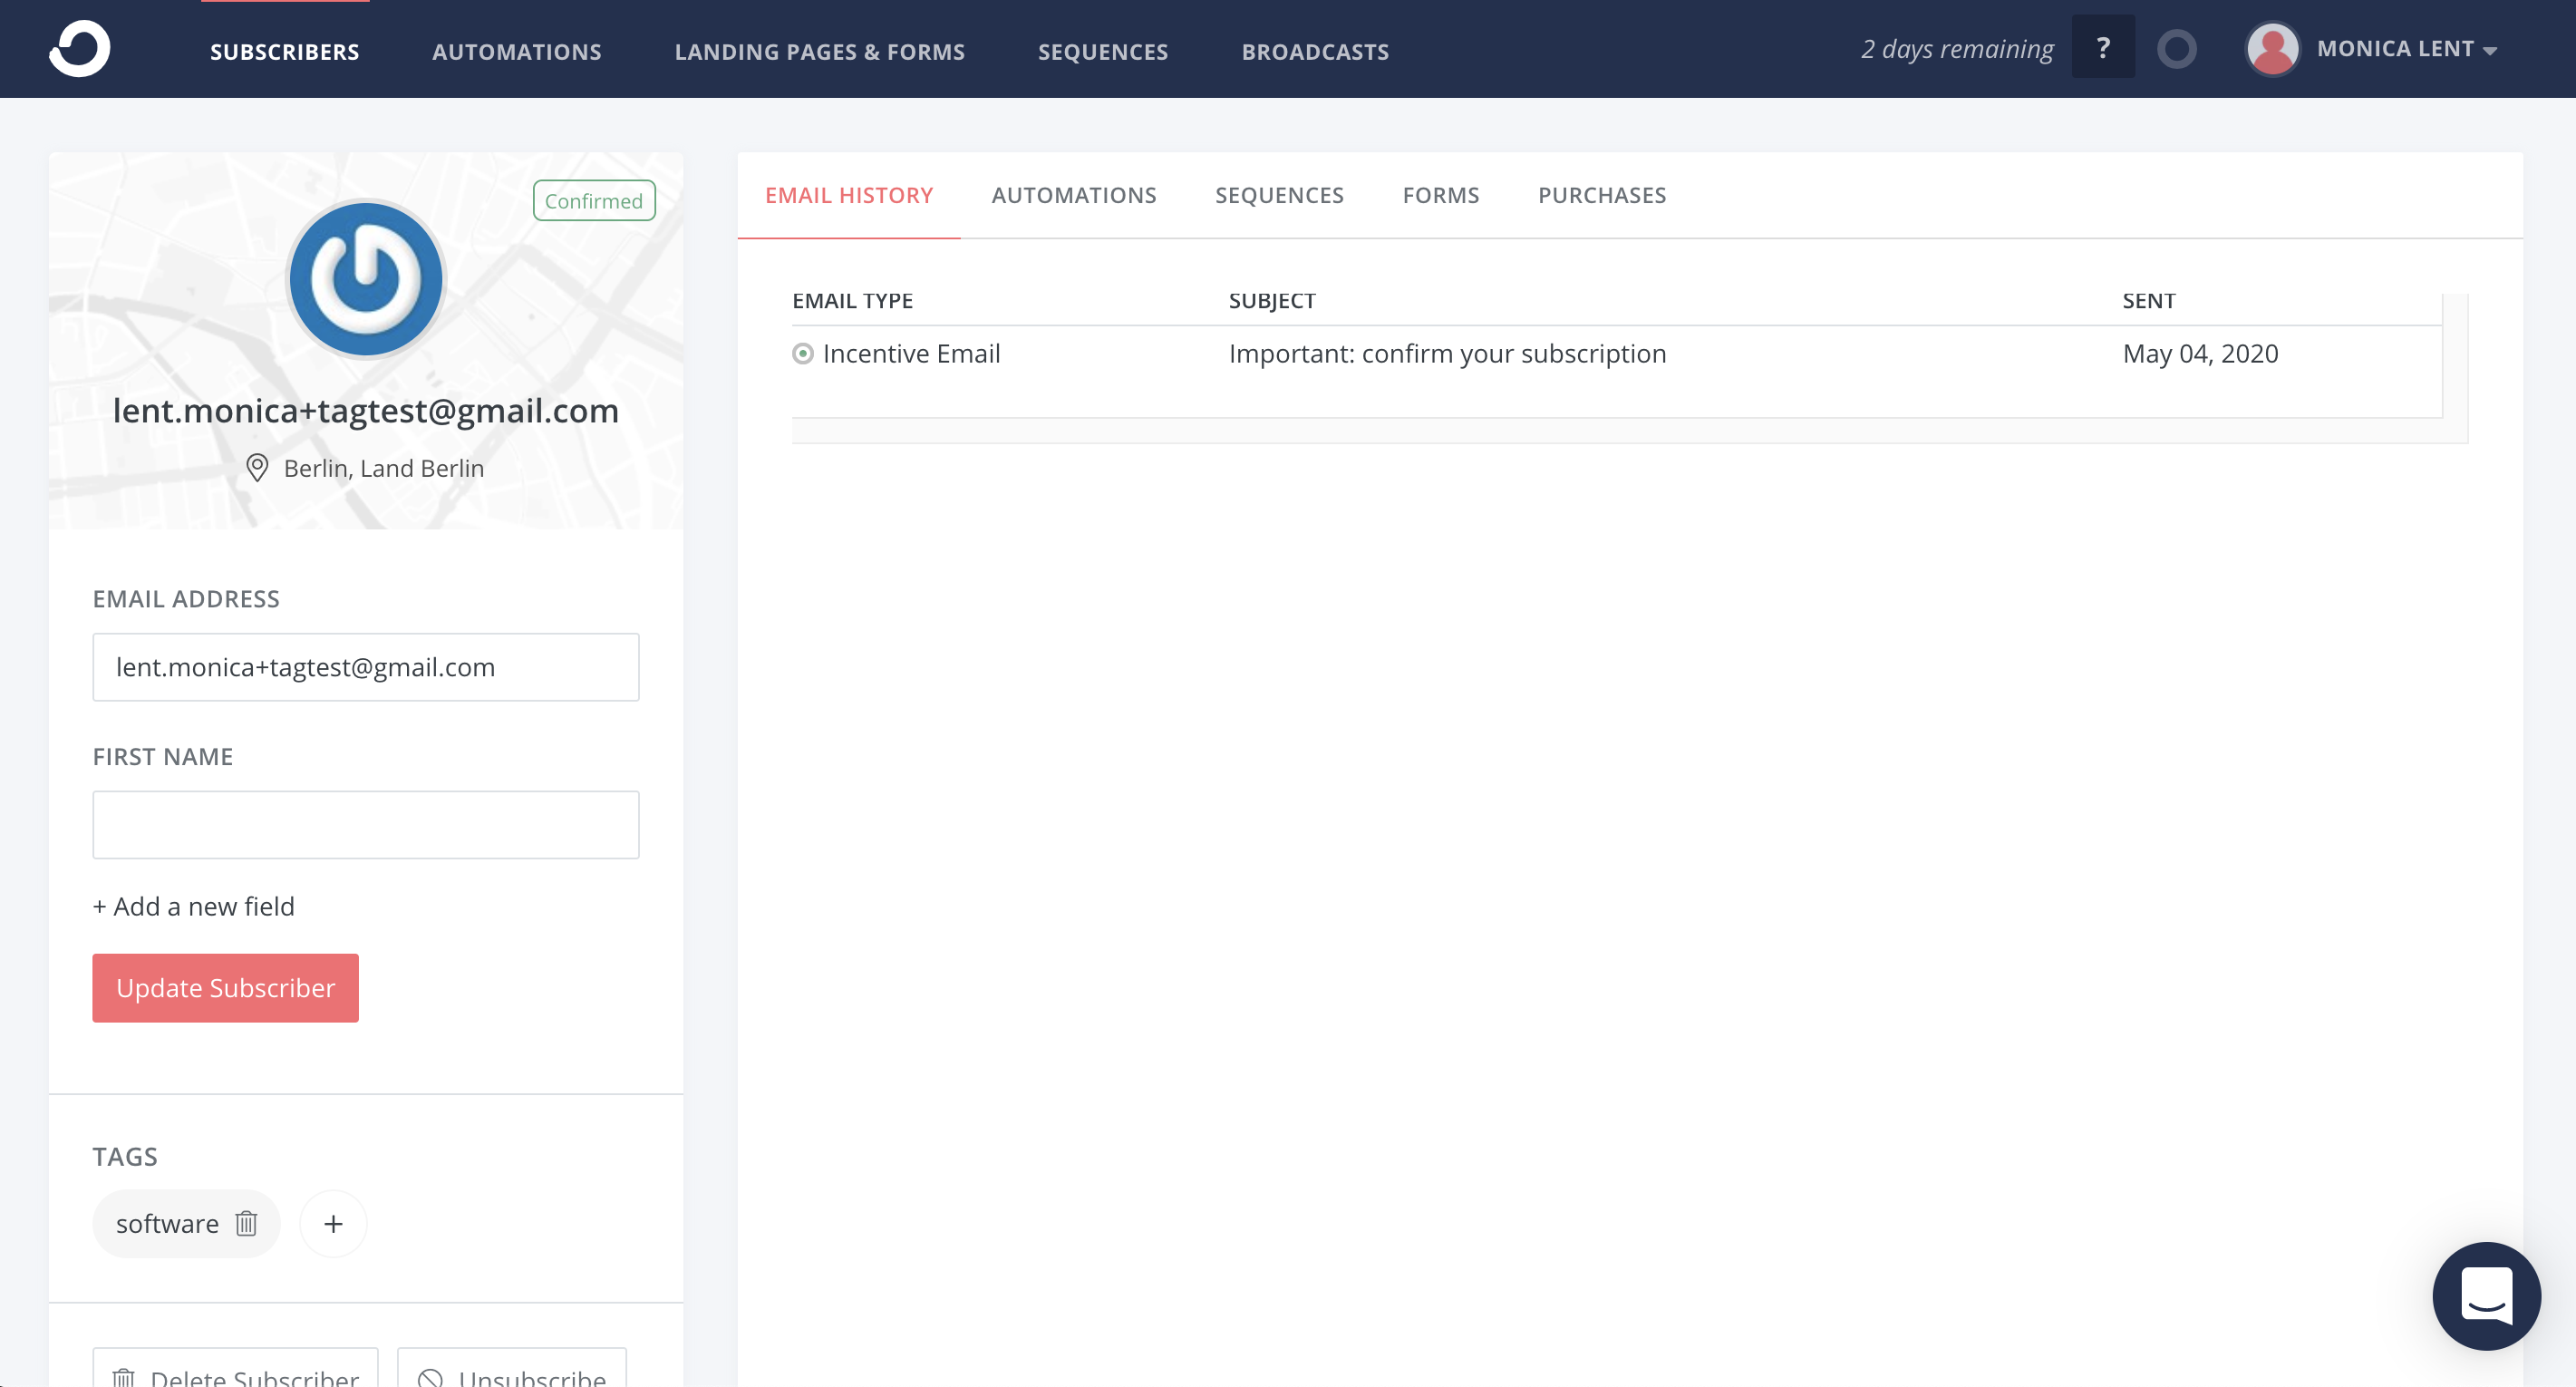
Then, go to ConvertKit and you should see a new subscriber! It’s you! And under TAGS you should see your custom tag.
Troubleshooting
ERROR #11467
The new node didn’t pass validation: child “id” fails because [“id” must be a string]
Go back and make sure that the tags in your ConvertKit yaml file have the IDs in quotes.
Advanced tagging techniques
Just briefly, I want to add two additional options which can be useful for better understanding your newsletter subscribers!
And that is adding two new custom fields:
- URL
- Referrer
Simply record which blog post the person was reading when they decided to subscribe, and where they came from (e.g. Twitter, Google, etc).
In JavaScript, you can use window.location.pathname to get the Path part of the URL.
And, you can use document.referrer to get the Referrer.
I’ll leave it as an exercise to the reader if you want to clean up this data so it can be tracked in a Tag as well 😄
Did you find this post useful?
I would be really grateful if you let me know by sharing it on Twitter!
Click here to share this post on Twitter, and feel free to subscribe to my newsletter and follow me @monicalent for more tech and blogging content :)